Thursday, January 12, 2012

Alaska Northern Lights


Ok, so this is kinda' stretching it on my Pinterest inspired blog, but this has been an exciting day for me that I just had to share!!

I guess I should back up and tell you what this story is all about.  Back in May, I had done a 4 foot by 4 foot painting of a Poppy field for my best friend and had taken it to the UPS store to have them package it and mail it.  While I was there, a lady saw the painting, 4 foot by 4 foot is kinda' hard to miss right?  Anyway, she saw it and told me that she worked at the local art gallery and she had never seen a painting like mine.  I do a lot of three dimensional accents to my paintings.  She said that I had to bring some of my work into the gallery!  It was a huge compliment and I was completely shocked and thrilled, and frankly, a little scared.  What if they didn't like my work.  I'm just now beginning to feel like I might be able to do this, what if I got shot down.  Would it destroy all the confidence that I had started to build when it came to my talents?  All of this was running thru my head and even though I knew I would eventually get up the courage to do it, I kept putting it off. 

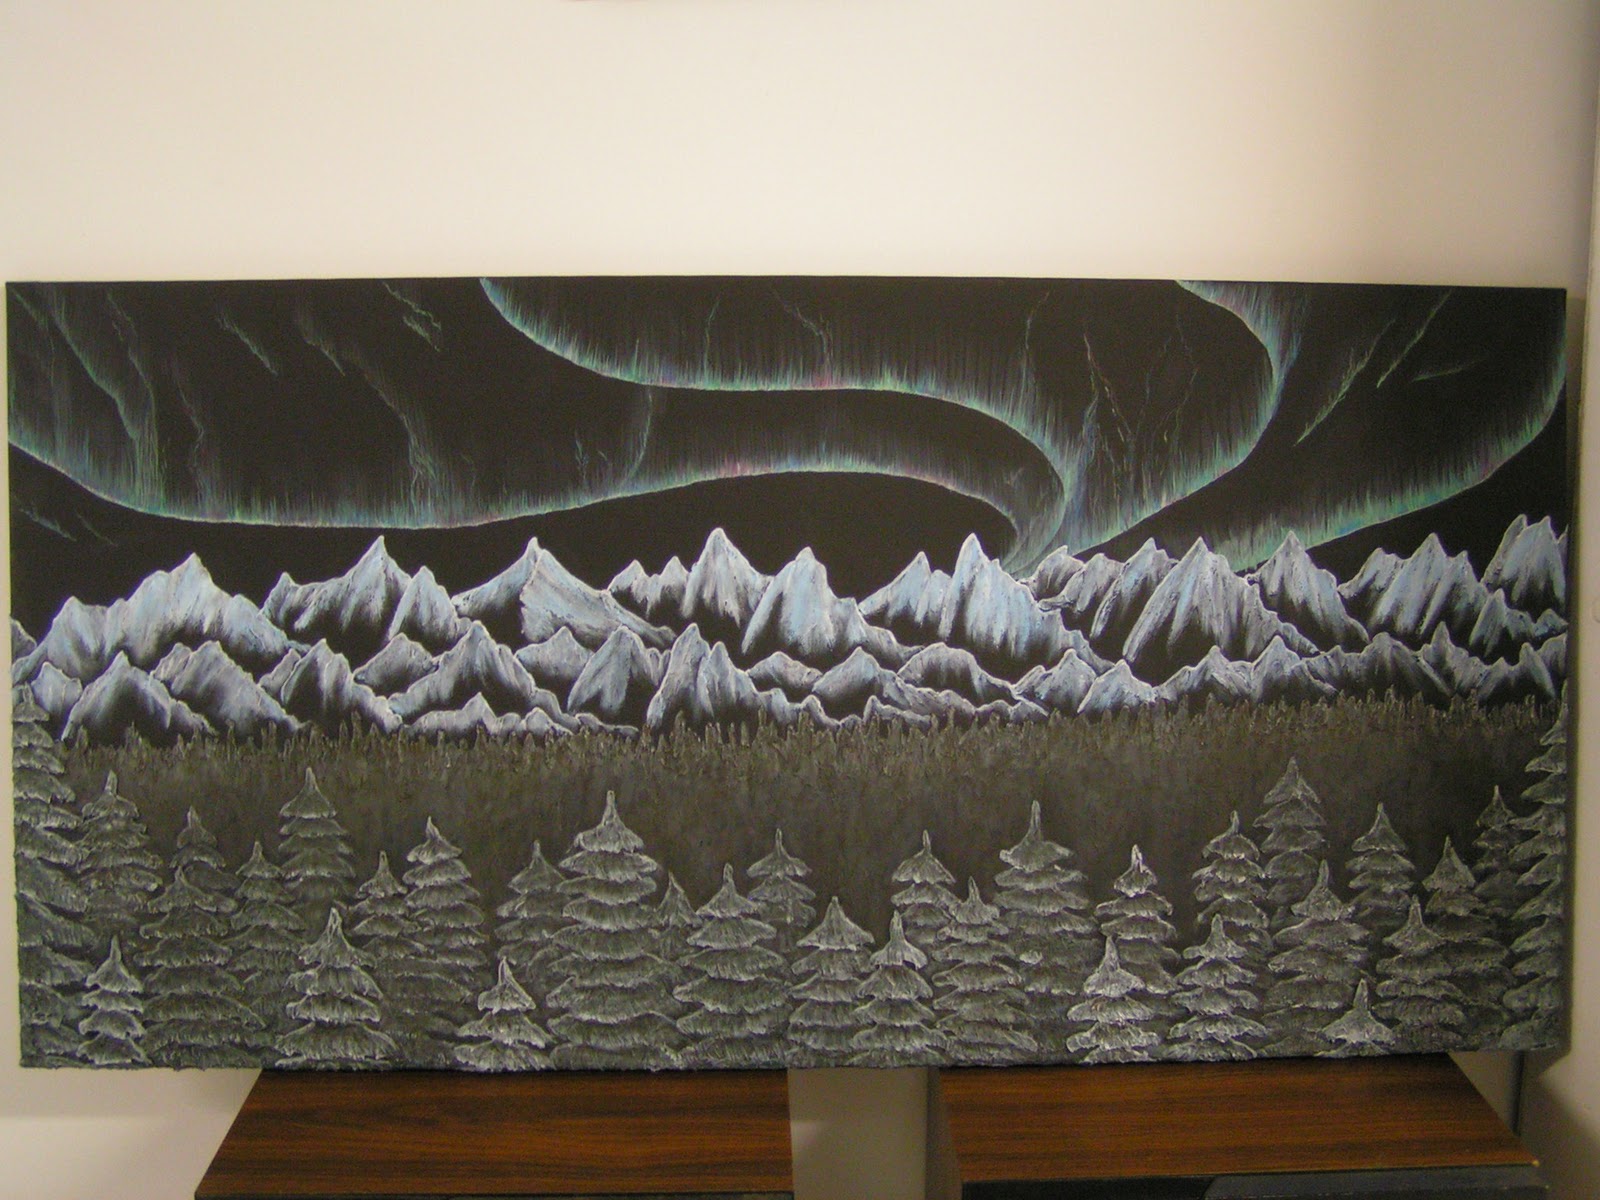
In October, my daughter-in-law, Jayme, had ask for a painting of the Northern Lights for her birthday present which was coming up in November.  I hadn't even planned to do a painting for her this year, I know she loves my paintings, but I kinda' felt like I might be overwhelming them with paintings.  But she ask for it, so, of course, it was hers!!   I painted it for her and I have to say, I thought it turned out pretty good.  Jayme said that it was her favorite painting that I had done for her so far. 
                                                                               
That gave me the idea that I should do a much larger version to take to the Art Gallery.  I made the decision to try and get it painted and to take it to the gallery in time for Christmas shopping.  It was exciting to work on it, but I had to keep reminding myself to relax and enjoy it.  I was putting way too much pressure on myself to make it perfect.  Finally,  I finished it and I really do think it turned out really good.  But, still, I couldn't bring myself to take it to the gallery.  Those nagging insecurities got the best of me.  I have to say in my defense that I did proudly display it in my own little art section in Danny's shop!

So, today, a friend came by to visit that we hadn't seen since last April.  He was out in the shop with my husband, Danny and he came and told me that Ken was here visiting.  As always, when he comes to visit we have to go have lunch at our favorite Thai Restaurant.  Before we headed out though, I told him that I had stolen a portion of Danny's Man Cave for my own goodies and to come up and see.  I took him up to look around and he saw my Northern Lights Painting.  He said that he loved it and wanted it!!  I just looked at him and said, "Really?!"  He laughed and said, "Yes, how much?"  He bought it!!  Holy Moly, he bought it!


Everyone tells me that I shouldn't be shocked when people want to buy my work, but, honestly, I hope the thrill of knowing someone likes my work enough to pay for it never wears off.  It's exciting and humbling at the same time.  I know I still have to work thru those nagging little voices of insecurity, and believe me, today helped me move in that direction!!   Thank you Liz and Jayme for your belief in me and my work!!  I am very honored that God gave me this talent and I'm also very proud that I am trying to use it to the best of my ability. 

Hey!!  This does connect to Pinterest, because I also use a lot of the photography for inspiration for other work that I want to do and I found one that just might be my inspiration for my next painting of the Northern Lights.  I do need to do another Northern Lights painting after all.  And who knows, maybe this one will actually make it into a gallery.
Pinned Image

What do you think?


Scroll to TopScroll to Top

Wednesday, January 11, 2012

A Tiny Tutu!!!!

As you know by now, my youngest granddaughter, Ella, turned one last Friday.  I had found several Tutu instructions on Pinterest so decided she would make a perfect little princess wearing a tutu while she opened the rest of her gifts on her big day.   I had to make her one!! 

DIY peacock tutu
This is pinned to my "DIY & Crafts" Board

Ella is a tiny little thing, she just had her one year check up and she only weighs 19 pounds.  Most of the Tutu patterns were sized 2T and up, but I could just picture her opening her birthday presents wearing her tiny tutu.  Adjusting a pattern like this was not big deal, right?  A couple of days before I bought all the material needed, she came over for a visit and I measured her waist size as well as the length from her waist to the floor.  Her waist measured 19 inches while she was fully dressed.  Didn't think that was a big deal since she would probably wear the tutu over her other clothing anyway.  From her waist to the floor was only 12 inches.  The pattern I had chosen said the tutu would end up measuring 12-14 inches long, I  thought that would be perfect, a long flowing tutu for our little princess!
For Christmas presents, I also had made all three of the youngest grand kids shirts with various decals ironed on and used fabric paint to put their names on them.  They were some of the very last gifts I made before Christmas Eve and apparently I was pretty tired and made Ella's backwards!!  She has a shirt with a cute little heart & crown that says "Princess" and her name painted on the BACK of a shirt! 

We all got a good laugh from that one and just a little teasing from my kids, since they always say that I lock myself in the Art room for an entire month before Christmas.  So, since her birthday was so close to Christmas, I decided it would be perfect to make her another one, taking care to make sure it was on the front, of course,  and also to match her new Tutu.  A whole little princess outfit for the Birthday girl!  Perfect!!

The pattern called for 4 1/2 yards of tulle.  I knew I wanted to make it two colors.  I had two of my older grand kids with me and off to the fabric store we went!  We found the tulle and my 9 year old granddaughter and I thought the extra sparkly tulle was perfect!  We picked out a pale pink and a white and Lainie carried it over to the cutting station.  Luckily, we weren't the first in line, so we stood and waited a few minutes and while waiting, we found that the "extra sparkly" was definitely not the best choice for a one year old!  Lainie was COVERED in glitter!!!!  Her coat, her shirt, her face, it was even in her hair!!  Not only her but even Landin, who didn't even hold the tulle had it on him!  We were cracking up, talking about how Aunty J's house would be covered in glitter,  and headed back over to pick out a less sparkly tulle for the project.  Got the fabric and the rest of the materials needed and headed home.

The pattern called for 27 inch strips cut 3 inches wide.  Knowing that it needed to be 12 inches long and I would be doubling the fabric, I cut mine 24 inches long instead.  I have to tell you that if you don't already have a rotary cutter, I would highly advise investing in one!!  I can't imagine doing some of my projects, this one included, without one!!
I got all the strips cut and unattached them from myself!  Tulle attacks!!

  In the instructions it had said to just tie a knot in the elastic and measure to the child before sewing, but I didn't quite follow that part.  I had already measured after all, right?  I had also noticed on the pattern the lady said "I use extra tulle because I like my tutu very full".  Sounded good to me!!  Nothing worse than a flat tutu!!  I started knotting the pieces to the elastic as per the instructions. Like I said, there is a lot of static in the tulle, that was the hardest part for me, just trying to keep it from clinging.  A premonition of what was to come?  Maybe.  I got into a rhythm and it moved along pretty fast.  I had also decided that I wanted a satin ribbon around the top to cover all the knots and the elastic.  The original pattern I used did not have that, but it was pretty easy to go back onto Pinterest and find instructions for that too.  Have I mentioned how much I love Pinterest?

I finished it pretty quickly and was happy with the results.  My granddaughter, Lainie, came over and saw it.  She said it was super cute but the waist seemed "kinda' big".  I'm still thinking that with clothes underneath it would be perfect, even though with all the "extra" tulle the lady had said to use to make it "extra" full, it was as wide as it was long.  I still wasn't deterred!  She was gonna' be adorable!!

Her birthday arrived.  Our baby is now one!!  She ate her birthday cake and enjoyed it thoroughly!  Her Mom took off her cake covered clothes .  Since it was time to open gifts anyway, I pulled out my gift bag, my vision of her opening gifts in her new outfit dancing in my head!!  She put it on and first of all the elastic was WAY too big, even with clothes underneath, her mom took the satin ribbon and tied it around twice to keep it from falling off.  Also, it really was EXTRA full, she couldn't even see the floor!!  Not such a good idea, especially since she is just learning to walk!!
This is the only picture I have of her in her new tutu because she only wore it for less than a minute!  She couldn't reach her other gifts to open them and it was so full and clingy she kept trying to push it out of her way!!  Oh well......we will save it for when she's a little bigger and can tame the beast, so to speak!!  At least her new shirt has her name on the front!!

Even though this didn't turn out quite the way I had envisioned I know there will be more tutu's in my future. I still think it was super cute, just not right for Ella.......yet!!!   I learned a lot this time around!!
Better gifts to come Ella!!


Scroll to Top

Tuesday, January 10, 2012

Alabama Crimson Tide!!!!!

I had to make an extra post to my blog today!!  After watching the BCS Championship game last night I had to definitely celebrate our victory!  Afterall, one of my boards on Pinterest is "Crimson Tide" afterall!!  This picture is from my Pinterest board called "Crimson Tide"!
Pinned Image


I was born and raised in Florence, Alabama.  Football in the south is, how should I put this, passionate, yes that's a nice way to put it, passionate!!  The bleachers even at the High School level are always packed with people, but the real love is at the college level.  The cheerleaders, the bands, the pep squads.  You definitely have to experience it first hand to truely understand what a big deal football in the south really is!!  My son, Chad had to go to Mississippi for a 12 week course for his job this past summer and he got to finally experience what I had been trying to explain for years!! He called me after watching his first game and told me, "Mom, now I understand".  There is nothing like it!

Most of my family cheered on the University of Alabama's Crimson Tide.  There were a few relatives who would root for the "other" team.  But for the most part we were all Tide fans as far back as I can remember.  One of my very first "football" lessons was right after I had returned home from a week at Girl Scout Camp.  One of our projects while there was to make a doll.  It was a fun project and I chose orange yarn for my dolls hair, I still remember how she looked.   I braided two ponytails and chose a blue material for her dress.  I was pretty proud of my new creation and after coming home I brought it with me to show it off at one of our family gatherings.  My Papaw (grandfather, for those of you not from the south) picked it up and says, "it would be a lot cuter if it wasn't Auburn colors".   He wasn't being mean, he even laughed, but I was shocked!!  I learned a lot that day (1)Football pride runs deep in the south (2)Auburn is not the right team to root for in our family (3)Auburn colors are Orange and Blue.

A few other fond memories of growing up in the south!!

One year my parents decided to drive our motorhome to one of the home games is Tuscaloosa.  It's only a couple hour drive from where we lived.  All three of us kids and my great aunt Goldie piled in and headed for the game!!  We parked really close to the stadium.  My parents turned on the TV and left us kids with Goldie!  They had only bought two tickets for the game.  We got to watch it on TV!!  It wasn't so bad though.  They could have turned on the TV in our living room and had Goldie watch us there, so the parking lot was definitely a better option!  I can still remember watching the game on TV and still being able to look over at the stadium and hear the roar of the fans!!  We won that day and I remember all three of us kids watching out the window as all the fans piled out afterwards.  The excitement was amazing!

Another time, my brother and I snuck into the stadium to try and watch some of their practice.  Those of you that don't know, this is a big no no.  Security kicked us out pretty quickly, but it was a thrill just to have been there in the stadium with the team for a short time and see them practice!  And, of course, the sneaking in part was pretty cool too!

Once, my Aunt Gladys brought a picture to show to the family.  It was of her with the famous, Bear Bryant.  The best football coach that ever lived!  I remember, as a child, looking at that picture in awe.  My aunt went to movie star status in my eyes that day!!

Over the years I remember lots of Sundays after church at my grandparents house.  All the adults huddled around the TV cheering on our team and yelling at the refs and us grand kids if we got in front of the screen!

Still, to this day, I can't watch the classic movie "Rudy" without crying!

I have talked to some of my family in Alabama today and the excitement of last nights game is electric!  People standing in line at the stores wanting to buy the new T-shirts and Championship memorabilia!!  They can't go anywhere without the topic of football coming center stage!  I wish I could be there just to feel that excitement again!  The pride can't be measured!!

Danny and I are hoping to make a trip back and visit my family either this spring or fall.  Even though I know Danny is hoping to hit a Nascar race, my parents home is not too far from Talledega either.  I, personally,  would love to be able to make it to a college game.  Honestly though, if that isn't possible, even a high school game would bring back fond memories of football in the south!

A few weeks ago, my neice ask me to do some paintings for her.  They are all her favorite images of the Crimson Tide.  Luckily I finished them just in time for her to see them before the big game.  She texted me after the game last night and now wants to add another painting to her new collection - 14th Alabama Crimson Tide Championship!!  I can't wait to get started!!

                                                                         ROLL TIDE!!!

Scroll to Top

Happy Birthday my Son!!

As promised, I wanted to show you Chad's birthday cake!  He and his daughter's  birthdays are January 6th.  My daughter-in-law, Jayme had asked for a specific cake for their daughter who loves rubber duckies right now, but for Chad she said to do whatever I want. Ahhhhh - creative control!!  What do do, what to do!!!!

I had made their wedding cake when they got married in November several years ago, it was a gorgeous winter wedding, the cake was all white with this beautiful shimmering dust that I put on to look like icicles.  Ever since then I had wanted to expand on the idea of winter cakes.  Since his birthday is January, definitely winter time, it was my perfect opportunity.   I went to Pinterest for a little extra inspiration!
Pinned Image
This is pinned to my board "Inspiration"

I had seen another cake a few months ago, that I didn't pin, but thought was beautiful, it was a dark blue fondont and had shimmering pearls all over it.  The thing I liked about the cake above was the dimensional snowflakes on the bottom left cake.  So with those two ideas in my head I got to work!

On the day before their birthdays, I made the decorations out of "Royal Egg White Frosting" out of one of my old "Wilton Cake Decorating" books.  Use 3 egg whites (room temp), 4 cups powdered sugar and 1/2 tsp Cream of Tartar.  Beat it on high for 7-10 minutes.  It is a nice consistency to work with but will dry hard within 24 hours.  I used a small round frosting tip and got creative!  My biggest concern was to be able to pick up and decorate with the snowflakes once they were dry.  If I made them too fragile they would shatter before I even got them to the cake, so, knowing me and knowing my luck,  just for "backup purposes" you understand,  I made more than double the amount that I thought I would use.

You might notice the yellow blob in the top right corner, well that was my attempt at seeing if the rubber ducky would be better as a royal icing ducky rather that a gum paste ducky.  Not so much!  Didn't look anything like a duck, so that idea was ditched almost immediately!

Oh and have to give you another little tidbit that goes into the "mishap" category.  I got the decorations made and started working on making their birthday presents (more on those in a later post), after all, I only had one day left before they had to be finished.  Started working on them and the power went out for 3 hours.  I got shut down for the night!!

So now, It's the big day and since I had lost a few hours the night before, I got up extra early and got started!  The cakes were baking in the oven by 8am!  I used 3 layers of 8 inch round cakes.  Chad's favorite cake is white cake with white frosting.  I used a regular cake mix for the cake but made homemade buttercream frosting.  It's SO much better than the storebought!!  I used blue food coloring and got to work!!  You have to do a "crumb coat"  It's just a thin layer of frosting, then I put my cake in the freezer for a few minutes to set the frosting.  That way you don't have crumbs showing on the final frosting of the cake. 

If you notice the glass of water and knife, I have a little trick I use to get all the lumps and bumps out of the frosting.  You could also use the special spatula's you can buy for decorating a cake, but I find a simple butter knife works just fine.  Just dip your knife in warm water and smooth over the cake.  Perfect!!
Once it's all smooth, I added a simple border with a flower tip and added the snowflakes!  Remember I told you about the sparkles that I used on their wedding cake, I also added those and found some Christmas cookie decorations that were tiny snowflakes, so added a few of those also. 

Also, remember, I told you that I had made "extras" of the snowflakes, just in case?  Well.........

It was a VERY good idea!!!

The royal icing recipe made LOTS, so I had more than 1/2 still left even after all the decorations.  I didn't want to throw it out, so..........
I made the kids little candies they can enjoy on our next "Nana Day"!


Happy Birthday Chad!  I'm so very proud of the Husband, the Father, the Man you have become.  Love you and pray that the best for you is still yet to come!!


Monday, January 9, 2012

Ella is One!!

I have had a very busy weekend!  My son's birthday is on January 6th and last year, he was lucky enough to have his daughter born on the same day!  So, this year my daughter-in-law ask me to make their cakes.  Her only request was that Ella's cake be a rubber ducky, since she loves them so much, but I could do whatever I wanted for Chad's cake.  So, I went to Pinterest for inspiration!!  I will show you how I made Ella's cake today and will post Chad's cake tomorrow!

 This is pinned to my board "Inspiration"

Pinned Image
 I considered just going and buying a rubber ducky to put on the top of her cake, but decided that I wanted to make one that she could eat.  So, off to the store and bought some "Gum Paste"
I have never worked with it before, but have watched cake decorating shows on the Foodnetwork channel and it always looked kinda' like working with clay or play dough, pretty easy right?  It's just a simple rubber ducky after all!  I was wrong!  It dries out pretty quickly, I had to constantly put a little vegetable oil on it to keep it moist and it got these tiny little cracks.  Plus, it was really hard to get it perfectly smooth.  The first time around I was gonna' make the body and the head two different pieces, but once I got them made it didn't look right, so remade it into one piece.  I also found that using a toothpick to smooth the edges of the beak and the wings into the body worked pretty good.  It was a lot more work than I thought it was gonna' be!
Now that the duck is made, It's time for the cake.  I knew I wanted to make it small, because she was gonna' have it all to herself.  The first birthday is always so much fun!!  I used the large muffin tins and cut off the tops of two of them to make her cake.  I also thought that whipped cream would be a better option for her rather than regular icing.  For one, it wouldn't be so sugary and heavy and for two, I thought it would look a lot more like bath bubbles.  I found this stuff called "Icing Spray".  So I piled on the whipped cream and then just sprayed it with blue icing spray.  I also added a few little gum paste bubbles.

Here it is!!
One last little tidbit on Ella's cake.  It flashed thru my head that I should wait to assemble the cake at their house, but didn't listen to that tiny little voice.  Got it all ready and headed over.  Holding it in one hand and driving with other.  Once I got there, my daughter and her family arrived at the same time, so I ask for some help carrying things in.  I gave this cake to my oldest granddaughter to carry.  We made it in the door and I hear Lexi say, "Landin!"  I look over and the cake was just a heap of blue whipped cream!  Landin had hit her arm and it fell!  I called my husband to bring the "repair kit"  More whipped cream and blue spray!  I cleaned up ducky and the bubbles and reassembled. 
Good as New!!

Happy Birthday Ella!  Nana Loves You!!


Wednesday, January 4, 2012

Lucky Enough to Live Here


Hello again!  An update on yesterdays post on "Salt Dough Ornaments".  The kids woke up and decided they needed to make more goodies, so I mixed up more dough and we made them thicker this time and used the 250 degrees for one hour method.  Well, they were perfect!!  No puffing up, no discoloration!  There you go!!

OK, I know I said the next post would be about the T shirt scarves.  I made quite a few of them for gifts at Christmas last year, but only made one style.  My daughter loves hers and actually bought a pack of T-shirts to make more, but in diffrent styles.  I told her I wanted to try out a few more styles so she gave me her shirts and I plan to make more to show you, so, stay tuned!

Yesterday, I took my grandkids home and it was the most beautiful day, which gave me the idea for this post!
Pinned Image

I wanted to share my beautiful state with you!  This is pinned to my Pinterest Board "Beautiful Places I've been and Love"

We have had a more than average snowfall and, I won't say it too loud for fear that it will hear me, but the wind hasn't blown in a while, so all the snow is still on the trees. It's breathtaking everywhere you look, so I wanted to share just a few pictures I took on the short, (less than 5 mile) drive to my daughters house.

                                 This photo was taken as I pulled out of my daughters driveway.


This was taken on the road entering my neighborhood.  I get to see this view everytime I leave and come back home!  How did I get so lucky!!


I am so lucky to live in such a beautiful state!  When I was small, my Dad got a job working on the slope as an electrician.  Back then the rotations were three months on and one month off.  It wasn't the easiest life, especially for my Mom, since she was a single mom for the majority of the year, but we made it work and I especially loved the summers!  Dad would take his vacation time so that he was home for the entire three months of summer and we would hop in the motorhome and travel all over the United States.  I am proud to say that I have been to almost every State in the Union, the only states I have yet to visit are the ones north of New York state.  I will make it there some day for sure!!  This is a beautiful country and I encourage everyone to see as much as you can see!

Our family remained in Alabama for several years, but Dad kept telling us how beautiful Alaska was, so finally, they decided that the motorhome trip should extend all the way to the Last Frontier.  The plan was to come here and stay for the summer, then head back before school started again.  We headed north, not without incident I must say!  Back then the Alcan was 90% gravel, but it was an adventure I will never forget!  We made it to Alaska and never looked back.  The summer turned into a year and a year turned into 10!  The first three years we lived in two motorhomes that my Dad built a lean-to to connect.  Alaska has changed alot since then and over the years, one by one, my sister, then my parents and finally my brother all have moved on.  But this is and always will be my home.  When we have visitors come from the lower 48,  I sometimes get the question, "Do you ever take this beautiful country for granted?"  My answer is always the same, "No!"  How could I ever tire of marveling at the beauty God has given us to enjoy!  No matter how many times I look at a mountain, it is ever changing, the shadow, the seasons, the colors. 

The New Year is always a time to reflect back on your life and look forward to your future.  I am a very lucky lady is so many ways I can't even count!  I have my faith that grows every year, I have my family, my husband and I are still in love after 32 years and we love our family beyond words, we are not without our struggles, but I'm proud to say that no matter what any of us face, we face it head on and work thru it and know that we have the rest of the family supporting us and praying for us, no matter what.  I have my friends, who over the years always become family.  Alaska is a place where you take others in and love them as your own.  And I have my beautiful state of Alaska, the Last Frontier.  How did I get so lucky!

Scroll to Top

Tuesday, January 3, 2012

Salt Dough Ornaments

Pinned Image
Pin from my Pintrest Board
"Christmas Present Ideas"

Well, remember I said a little something about mishaps for our blog?  Guess what!  Happened, happened and happened!! 

Last night I got a new post all ready, believe me I'm not the most savvy computer person, so it took me a while, but I got it all ready, pictures and all, hit "Preview", 'cause, you know, you wanna' make sure it looks good.  BAM!!  My computer freezes up on me!  But, I had a sleepover with the grandkids and we needed to do a remake of the salt dough ornaments (explanation to come later), so I decided to wait until this morning to post.  The kids are still sleeping, so wish me luck and pray my computer doesn't sleep again too!!   Here goes!!

Ok, so, Salt dough ornaments.  I found several different ideas and the one above is one I posted to my Pinterest board "Christmas Present Ideas".  I thought these would make great stocking stuffers from he kids to their families this year.  After all, what parent doesn't love anything their kids make!  So I mixed 1 cup flour, 1/2 cup salt an 1/2 cup water.  The recipe said to knead for 10 minutes. 

I had my three youngest grandchildren here that day, so we put the baby down for a nap and got to work!  We rolled out the dough to about 1/8 inch thick and cut out 3 large hearts, 2 Christmas trees and 6 small hearts for our projects.  The kids loved it and there was plenty of dough leftover for them to play with and make their own creations.

The kids made hearts with their fingerprints onto each one.  For the small hearts Landin did his own, both of my son's girls were here so for the small hearts I had them each make an imprint of their fingers for each side of the heart to form one heart with both their fingerprints.  I used an old ink pen to make the imprint of the year.  We just baked the Christmas trees as is because I had other plans for them.

Ok the mishap part.....  I used a recipe that said to bake them at 325 degrees for 1 1/2 hours.  They all turned out a dark brown, which I didn't mind so much but they also puffed up, unlike all the pictures I saw others had made.  I assumed it was because I baked them too long. 


Also, after they were baked I painted the Christmas trees and had the kids put their fingerprints to simulate the lights, but because they were puffy the paint made them extremely fragile and they broke. Those didn't even make it to Christmas!!!

The hearts however were a big hit!  With the small hearts we made key chains for the Dad's, bookmarks for the Moms and older sisters and dated Christmas ornaments out of the larger ones!  The kids were thrilled to have made everyone gifts and everyone was pretty impressed with them!  The directions had said to seal them with a clear sealer, but after the Christmas trees, I was afraid to put anything on them, so I left them as is.

A day or two after Christmas, my daughter found out that they also make excellent doggie treats!!  She noticed her lab licking the ornament hanging on their tree.  She shooed her away, not thinking anything about it but left the room and came back to no ornament on the tree and somehow the small heart on her bookmark mysteriously had disappeared!  Maybe the sealant was for more than one purpose! 

I also ask my daughter-in-law if she liked her bookmark we had made, she looked at me with a blank look on her face and said, "what bookmark".  It must have gotten mixed in with other used wrapping paper and disappeared.  The kids thought maybe their dogs had eaten hers, but since the whole thing was missing rather than just the heart, I'm thinking not. 

So,the request was made that we do a "take two".  It sounded good to me, because, for one, they must have been a good gift if they wanted replacements and two,  I wanted to see if the temp and baking time of the first round was the reason for the mishaps.  So, last night, we had a sleepover and did some "redos".   This time we used a different recipe that said to bake at 250 degrees for 1 hour.  They weren't quite so brown, but they still puffed up.  Personally, if they are gonna' puff up anyway, I liked the darker brown.....oh well.


I'm sure we will try this again, either for gifts or just for fun.  I'm thinking next time around  I will try making them a little thicker to see if that makes a difference.   We will see, but overall this was a lot of fun for both me and the kids.  That in itself made it worth doing!


Talk to you soon, my next project is "T shirt scarves". 


Scroll to Top